Zanda for Admin
Once you have opened and logged into Zanda, the Therapy House calendar will automatically open.

Daily Tasks
- Once you have opened and logged into Zanda, the Therapy House calendar will automatically open. On the top of the page is a Task Bar that includes All Practitioners, All Locations, Today, Day, M-F, Week and a few other symbols.

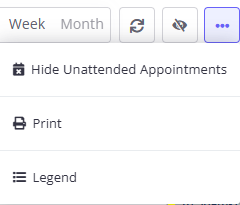
- When opening Zanda, the Calendar will include all appointments, including those that have cancelled. To display only active appointments, click on the ellipsis, this will bring up a drop-down menu. Click Hide Unattended Appointments.
- Click on All Practitioners to open a Calendar view of all the clinicians' bookings. By clicking on Today, it will bring you to today’s appointments.
- To see a Daily, Monday-Friday or Weekly view of the Calendar, click on either Day, M-F or Week (includes Sat & Sun).
Appointments
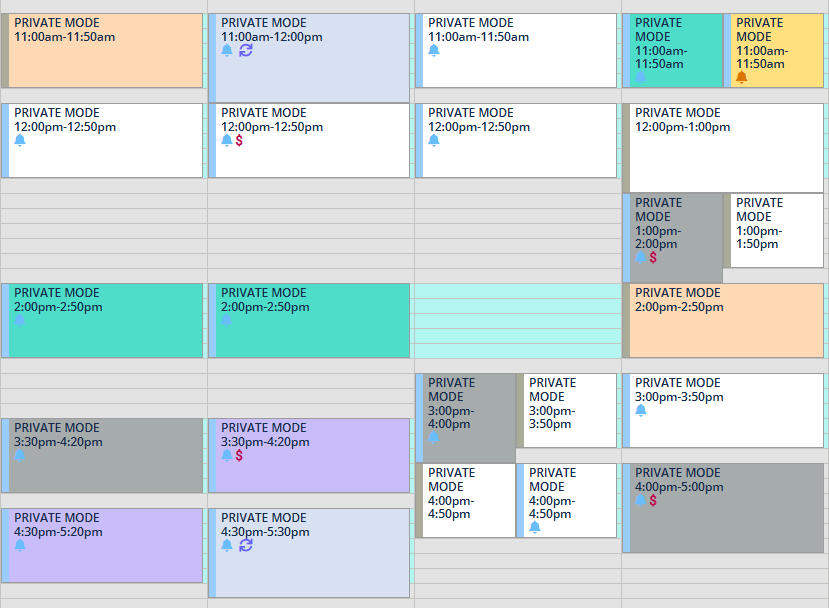
- Zanda uses a number of different colour coding across the calendar and appointments. If you ever are unsure of what a colour means, you can access the Legend from the ellipsis in the header.
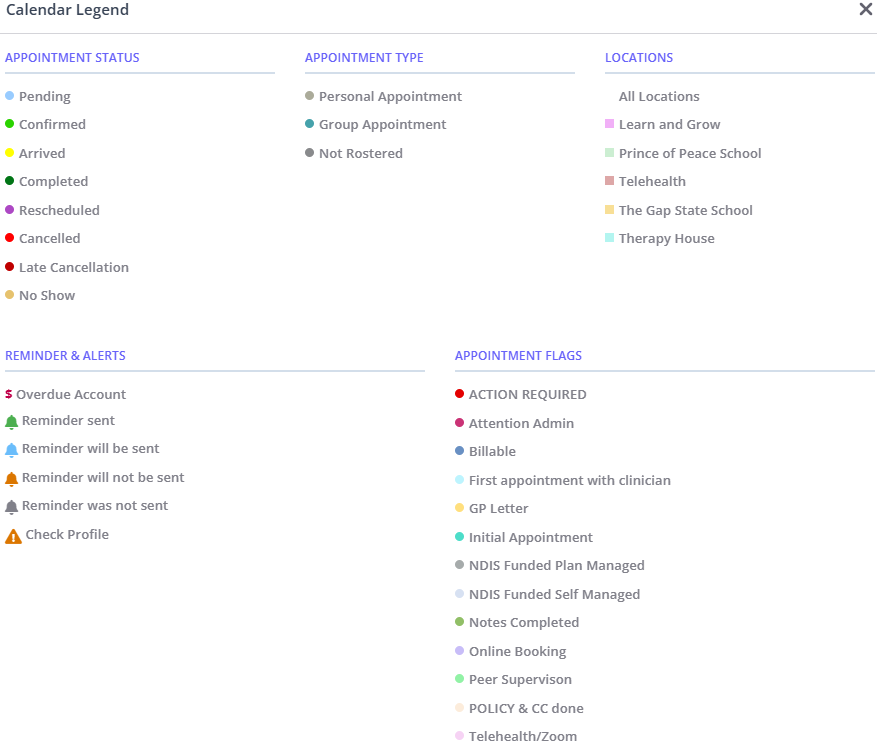
Managing Appointments - Status
- Appointments that have been booked but not confirmed by the client are blue.
- Appointments that have been confirmed via SMS will automatically be light green.
- To check in a client, right click on their appointment in the calendar which will display a dropdown list. Click Set to Arrived. The left side of the appointment box will change to yellow showing the clinician their client has arrived.
- Once you have taken payment and processed any relevant Medicare rebates, follow these same steps and Set to Completed. The left side of the appointment box will change to dark green.

Managing Appointments - Flags
- Appointments with a white background are default and typically are Medicare/privately billed clients.
- Appointments that have a teal background are an initial appointment.
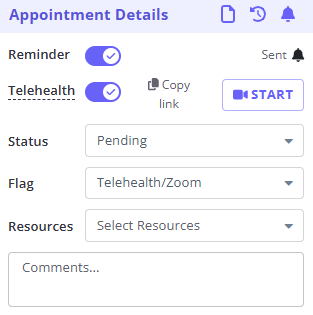
- Appointments that have a pink background are a Telehealth appointment. Ensure that the Telehealth option has been switched on in the appointment details (a video symbol will show up on the appointment).
- Appointments that have a light grey background are a Self-Managed NDIS client.
- Appointments that have a dark grey background are a Self-Managed NDIS client.
- Appointments that have a purple background are booked online. Make sure to check the previous appointment's invoice to ensure the client is being billed correctly as online bookings may default to a standard appointment (e.g. NDIS client, evening appointment).
- Appointments that have an orange background have been toggled to flag that the client has a 'warning' associated with their profile (e.g. separated parents).
- Appointments that have a dark blue background are a billable non face-to-face appointment. These include reports or resource creation.
Telehealth Appointments
If a client requests a Telehealth appointment:
- Ensure that the Telehealth option has been switched on in the appointment details (a video symbol will show up on the appointment).
- Change the Flag to Telehealth/Zoom.
- Send the client an email through Communication → New Email, selecting the appointment time and the template Telehealth Link.
OR - In the appointment, select Copy Link and send the link to the client via SMS.